CONTACT US
SELL YOUR VIDEO GAMES
THE BLOG
CF Search
Shop Nintendo
Nintendo NES
Super Nintendo
Nintendo 64
GameCube
Nintendo Wii
Shop PlayStation
PlayStation 1
PlayStation 2
PlayStation 3
Shop Sega
Master System
Sega Genesis
Sega 32x
Sega CD
Sega Saturn
DreamCast
Shop Xbox
Original Xbox
Xbox 360
Shop For Everything Else
Atari
Turbografx 16
Panasonic 3DO
Video Game Manuals
Shop For Gaming Consoles
Shop For Handheld
Check-Out
Sell Us Your Games
Check Out Our Blog
Sort by
Sorted Product Name +/-
Start
Prev
1
2
3
Next
End
Page 1 of 3
Results 1 - 15 of 31
15
30
60
150
Video Game Consoles for Sale
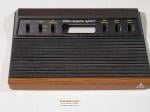
Atari 2600 6 Switch Woodgrain - Console Shell Only
$49.99
$49.99
Product details
Nintendo 64 - 3 Games Sports Console Bundle - N64 System
$194.99
$194.99
Product details
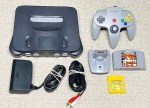
Nintendo 64 - Console Only with Jumper Pak - N64 System
$99.95
$99.95
Product details
Nintendo 64 - Goldeneye 007 Console Bundle + Expansion Memory - N64 System
$199.95
$199.95
Product details
Nintendo 64 - Pokemon Bundle with Transfer Pak - N64 System
$224.99
$224.99
Product details
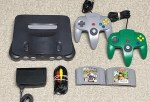
Nintendo 64 - Racing Bundle with Diddy & Mario - N64 System
$224.99
$224.99
Product details
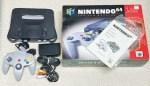
Nintendo 64 N64 CONSOLE Bundle Complete in Box with Manuals + Hookups - System
$249.95
$249.95
Product details
Nintendo GameCube Black CONSOLE Bundle Complete in Box + Hookups - System
$199.95
$199.95
Notify Me
Product details
Nintendo NES Console Kirby's Adventure Bundle & New 72 Pin
$199.99
$199.99
Product details
Nintendo NES Console Super Mario Trilogy Bundle & New 72 Pin
$224.99
$224.99
Product details
Original Nintendo NES Console System Bundle w/ RBI Baseball & Tecmo Bowl & New 72 Pin
$174.99
$174.99
Product details
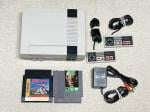
Original Nintendo NES Console System Contra Bundle & New 72 Pin
$224.99
$224.99
Product details
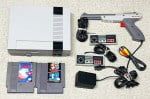
Original Nintendo NES Console System Mike Tyson's Punch Out Bundle & New 72 Pin
$214.99
$214.99
Product details
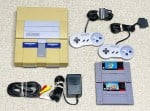
Original Super Nintendo Console + Mario Kart SNES Bundle
$194.95
$194.95
Product details
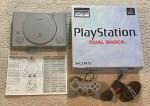
PlayStation 1 CONSOLE Bundle Complete in Box with Manual + Hookups - System PS1
$144.95
$144.95
Product details
Start
Prev
1
2
3
Next
End
Page 1 of 3
© 2007 - 2024 All rights reserved. The Old School Game Vault